Thursday 30 October 2014

Designing with Mother Nature

So, here we are, once again, not quite Fall yet the holidays are fast approaching.  So many things to do and so much money spent.  Why not use Mother Nature a little bit more in your seasonal decorating to help ease the strain? Before it gets too cold or the first snow flies (let's face it, this is Canada and that could be any time) go for a walk and have a creative look at bits of nature. 

Here are a few quick and easy ideas to help you along the way:

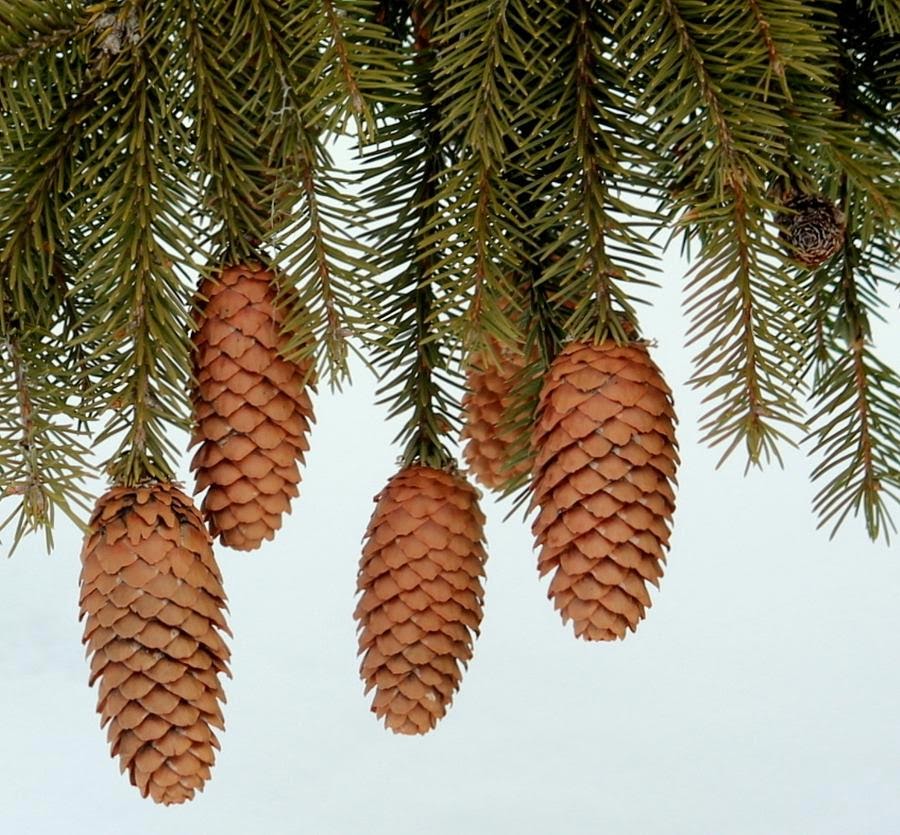
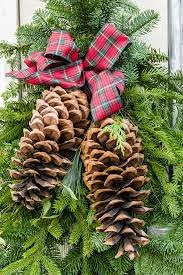
Go on a  pine cone and acorn hunt. This is great for kids too!  Make it a fun adventure. Take a bag, or two, with you and collect all different cones and acorns, in all shapes and sizes. Once you get home you can separate them and use them in so many ways
-large ones, in a bowl, add some ribbon and you've got a lovely display
-spray paint any to match your "theme"
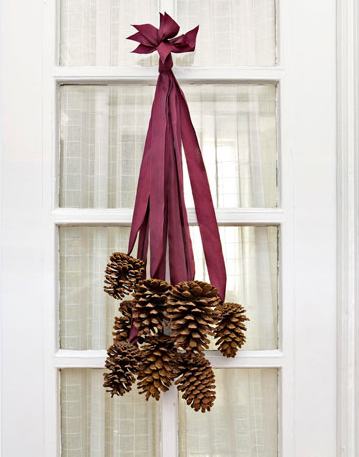
-tie ribbon around large ones to hang in windows or over large pictures, or even take a few with different ribbon lengths, and make a door swag
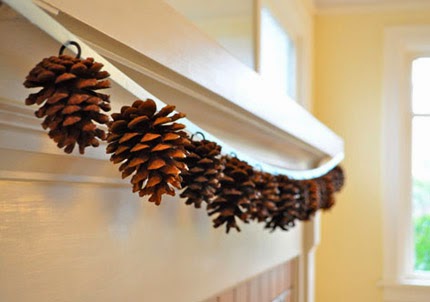
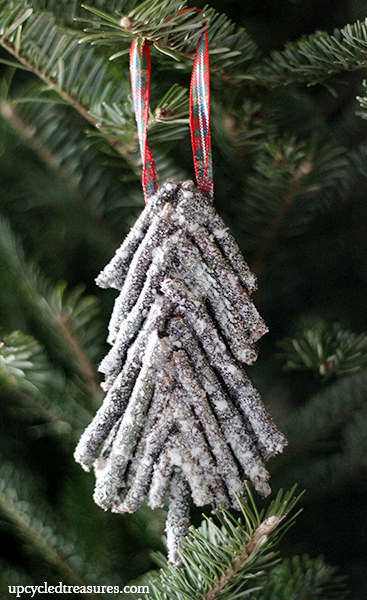
-smaller cones can even be sewn together as garlands and even painted as desired
-using inexpensive wire all sizes can be wired to hang as ornaments
-wire together small cones, add some ribbon and make some beautiful natural
gift or gift bag toppers
-even out the bottoms of large cones and use as place setting markers for your seasonal table
-get a wreath form and make your own natural wreaths and how elaborate you make it totally depends on your creativity
-glue some around an inexpensive tray (smaller, pliable ones work best for this) and you can make a lovely centrepiece or even a handmade gift
-add some to your mantle or freestanding on side tables for some extra natural warmth
-pick up some scented oils (concentrated) and soak cones in your favourite seasonal scent beforehand to add some lovely  fragrance to a front hall, living room or washroom
 (much like scented candles, try to keep away from dining areas as the scent may conflict or overpower your food aromas)


Grab some evergreen boughs or even bits and pieces.  These can be placed throughout your home, giving not only a lovely smell, but a trek back in time. 
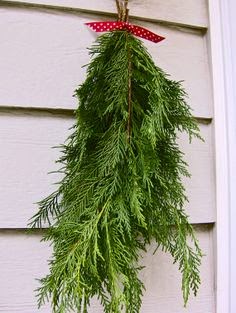
-if you're not into the natural look you can even spray paint the evergreen to match your colour theme.
-tie a few boughs together to create hanging swags. 
-assemble as a garland using wire and ribbon.
-make a "bed"  as a table centrepiece onto which you can place a clear plate with pillared candles
 -and don't forget the outside-your entry way or porch could always use some natural decor


 You can do so much with birch bark, from wrapping candles and plant pots to making small trays and you can even make one of a kind ornaments and tags.   You are only limited by your imagination.....


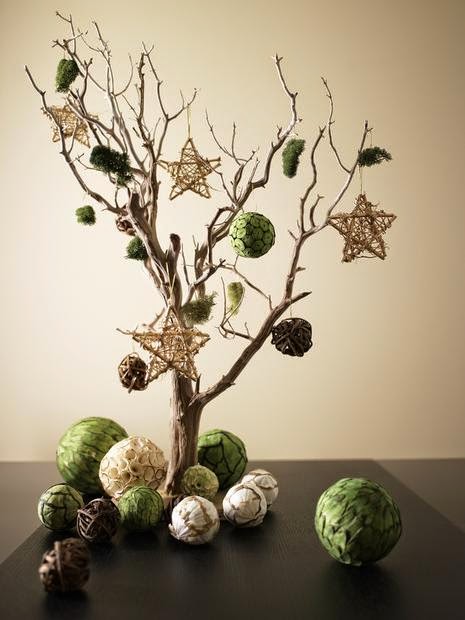
 Don't forget about twigs and small tree limbs...standing on their own in a large vase, either natural or painted, can be very effective and if you add light, ribbons or other other natural items it can be beautiful.

 Smaller pieces can also be used to make interesting ornaments, as the base of a natural display, or even mixed in among the natural garland draping your mantel. 

                               So, before we see our annual Winter Wonderland ,
                         grab some of  Mother Nature's Fall bounty and be creative.
                                                   Your choices are endless!

Saturday 11 October 2014

Decorate for Thanksgiving-Quick! Easy! No Cost!

Thanksgiving is here and you want to make it special.  All of the  special dishes you're making will, I'm sure, be resounding successes but have you added a touch of fall to the event?  With all of the shopping, baking, cooking and every day life there doesn't seem to be anything time or money  to decorate. Here are a few really easy and no cost decorating ideas that can even be done with kids. All you need is some thread, some scotch tape (or glue if you have time), scissors and some beautiful leaves.  


Go outside and pick up some leaves or, better yet, let your kids choose the leaves.  Make sure you get quite a few to really make an impact.  Once collected, wipe off the leaves and let them dry a little, then gather your other supplies:


F
irst you can make a swag or garland using thread, tape and leaves.  Measure out how long you want the garland to be and cut the thread (I doubled the thread just to make it a little stronger)  


Then place the leaves on the thread in the order you like making sure the thread is on the back of the leaf.  Then start taping the thread to the leaves.


Make sure you overlap the leaves in order to have a continual leaf garland and to ensure no thread is showing


Once you've finished securing the leaves you can then hand your garland or swag and, since it's so light, it can easily be hing by a small piece of tape.  Make a few and hang them anywhere-in doorways, in your windows, around lamp shades or even use them as decorative runners on your table.  You can even back them with some cardboard, salvaged from your recycle bin, to make a wreath. You are only limited by your imagination.


Now, take a look at your table or side tables.  You can make some festive, seasonal centrepieces by just layering leaves out in a circle and placing a glass plate on top.  You can put anything on this plate-a lovely bowl, pictures, fruit etc.  or even a candle (making sure it is a secured tea light, votive or battery operated) You can build out as far as you like, depending on how many leaves you have.  Such a lovely autumn display.  


You can also take a few glasses on do the same but inside the glass instead.  For these it would be better to use battery-operated candles, for safety reasons.  


You can make a real statement by using items you already have and bringing the natural beauty of fall into your home. Don't forget to use individual leaves around your house as well.  These touches will  only add to what you've already done.  You haven't spent any money but you've created something memorable. Keep that in mind for every season.  Happy Thanksgiving!

Wednesday 8 October 2014

Sheets-Not Just For Bed!

For anyone who is trying to fix up a room, with limited money and time,  sheets are a great tool. You can still find inexpensive single sheets, in all sizes, colours and patterns at many department stores and a quick trip to thrift shops might even get you some amazing vintage finds.

Try to  change your mind set, think of sheets as just fabric waiting to be made into something else.  I have used sheets in many ways over the years.  When I really wanted, or needed, to make a change,  and didn't have a lot of money to do so, using sheets really helped stretch my decorating dollar.

Sheets are great instant curtains.  They are easy to sew, wash well, hang well and can cover a large area.  And, if you don't sew, you can use iron-on fabric tape or even cut an opening in any existing top seam.  This is a great alternative for people who are on a limited design budget, for a quick and easy change, for anyone in a design "transition", renters who don't want to put a lot of money into their home design, home staging, or for those just starting out.

Sheets can also be used as closet covers,  on any openings when doors  are not yet in the picture or even as shower curtains (vintage patterns are great for this). They can also be used to divide or screen an area of a room into which you don't want a direct view-especially good for bachelor apartments. 

You can use sheets to cover furniture, tucked in for a quick fix or actually draped and sewn to fit.  They can be used as tablecloths, cut to make pillow covers or they can be sewn to make a custom "duvet" cover for that comforter you love that has some wear.

You can add extras, layers, valances, braiding or trims to make whatever you're using the sheets for, a little more dramatic.  You are only limited by your imagination.

So, the next time you're at the store, have a good look at the sheets.  Something might just catch your eye and you'll realize that sheets don't have to be just for bedtime but can really wake up your whole house. Go on, start day dreaming.

Saturday 4 October 2014

Inspiration

Inspiration is all around us, you just have to look for it.

Books, magazines, advertisements, travel, websites, art, nature and even fashion.  You can find inspiration for your design sense or style anywhere. All great design starts with inspiration and all it takes is one small seed from which you can grow a garden.


You see a colour that resonates with you and, from there, your eye starts seeing things that compliment it.  You see a piece of furniture and you are taken with the style.  It makes you want to explore that style even more.  You see a pattern that you are drawn to and you end up picking out colours that work.  All it takes is a spark and from there your choices are endless.  You will find that everywhere you go you will build on your original thought and once you start it's hard to stop.


Even if you're not planning on changing anything immediately you may be thinking of doing it in a few months so take the time to let your inspiration guide you.  Walk through dollars stores, clearance departments, and even thrift stores (I make this a regular event)  Just wander and browse and, sometimes, along the way, you will come across items that will work really well with your plans.  You will be surprised how you will manage to pick up things you would have never thought you could on your budget.  By the time you're ready to make over that room you will have all that you need with no major dents in your bank account.


So, go for a walk.  Keep your eyes open to new things.  Make note of things, colours and styles that you like and let your inspiration take you away.

Sunday 21 September 2014

Reinvent and Don't Spend A Dime!

There is so much you can do with what you already have.  Whether it's staging your home for sale or redesigning a space in your home for a change, if you have some time, and a little creativity, you may not have to spend a thing.

Walk around your house and look at all the accessories, pillows, throws, pictures and even furniture. Make a mental inventory of what you have.  Now, pick a room, for instance the living room? Really look at what's in there and how you can move things to shake it up a bit.  What really fits and what can you remove? Go back to your mental inventory and picture any other items in your house that would not only add a design element but would also function well.  Move furniture and experiment with new settings. Even small changes can make a huge impact.

Change pictures around on the tables.  Mix up the accessories.  Look at what's on your walls.  Can you change any art around without leaving marks and will the art or decorative pieces work in other locations?  If this is something you will consider doing on a more regular basis then start off with using removable picture hooks/hangers.  Saves a lot of time, you can re-position as needed and you won't be left with any holes to fill and touch up.

Can you change up or move your lamps? A subtle change in lighting can make a room look entirely different, especially with task lighting and heights or lamps.

Look in your linen closet. Do you have any cool throws or quilts etc. that you could drape on a chair or couch?  

What about the lovely basket you received as a gift?  Too good to get rid of but what to do with it?  How would it look beside a chair, holding books, magazines or papers?  By using it this way you will have created a comfortable reading area.

What about the various vases you have that rarely get any use?  (I have a few of them) How would they look on your kitchen counter, holding some nice cooking or baking utensils?

The lovely glass bowl that is never used? Why not put it to use in your bathroom to hold some nice facecloths or soaps or even in your front hall to hold keys and change?  

Use the footstool, that just sits in the corner, to hold and display a variety of blankets, quilts or pillows.

You have a set of napkins that you never use?  Maybe you can attach them to the top of a window treatment as a valance.

You have a set of glass jars that you had purchased to use in the bathroom? Why not clean them up and use them in the kitchen.  Display them on your counter as containers for tea, coffee, sugar, pasta or anything else you may want available. 

Napkin rings as drapery tiebacks?
A lace tablecloth as a window sheer?
A table runner as a valance?
The small occasional table that seems out of place in your living room might be a welcome addition to a washroom or front hall?
The freestanding coat rack that rarely gets used in your front hall might work well in your bathroom to hold towels?
The small bookcase that gets lost in another room might look great in your dining room or kitchen, showcasing any of your pretty china, glassware or accessories and may provide you with an extra service area?  This is great if you have a small dining room or no china cabinet.

Do you have any purses you don't use?  Any decorative or solid purses can be hung in a bathroom or bedroom to hold jewellery, accessories or even make-up while soft bags can be hung on the back of your closet doors to hold various clothing accessories or lingerie etc., freeing up needed drawer space and providing you with dedicated storage for your items.

These are just a few examples of how you can make changes in your home, using what you already have.  No cost, just an imagination.  Look at any item and picture it in a different setting or having an alternate use.  You will surprise yourself with what you can come up with and how you can reinvent any space with only a few subtle changes. 

Now, go on, you can do it!
Make some changes!!
Have some fun!!!


Thursday 18 September 2014

Paint and more-a link to check out

I don't want to start advertising or promoting companies on this blog-not my goal- but since I will be posting all about paint soon I thought I'd pass on this link.  Looks like a fun kit, with great paint and a few extras.  I will be starting my family room, stairs and landing soon so I may just take advantage of this one myself...http://www.benjaminmoore.com/en-ca/for-your-home/do-it-yourself-with-ben-and-me

Saturday 6 September 2014

A Transformation

I have finally finished my daughter's room.  It took some time to get it the way I wanted it (and the way she wanted it) but it is complete.  She and I are both very happy, content, relieved etc. etc. etc. A lot of work went into this transformation (before, during and even after) but it was all worth it, in the end.

Before, well sort of....

And after............


My daughter wanted a chic, vibrant room that made an impact and, of course, had New York all over it. What can I say, she's growing up and I love a creative challenge. 

First we chose the colour pallet.  Although we  hadn't officially chosen the exact colour, before I started collecting furniture and accessories,  it was decided that the room would be a vibrant blue with black furniture and accents and would have a touch of silver, here and there.  The black and silver really showcase the blue.  Once we had a theme or feel of the room and a general idea of colours I started to look for all of the rest.  This is the part I enjoy.  I started checking clearance sections of my favourite stores, perusing thrift stores , keeping an eye open on all of my local Buy and Sell Facebook groups and even checking for online deals. By taking my time I managed to find some great items for some great prices and everywhere I went I had my  notebook with room dimensions, lists of what I already had, a list of things I still had to get and, of course, a wish list.  I managed to find some great pieces of furniture, terrific window treatments and some really fantastic and funky accessories.  All complete, this room cost approximately $500 which includes all the paint, all the furniture, new draperies, drapery hardware. shelves, frames, throw rugs, the wall poster and all of the accessories.  I painted all of the furniture, which was transforming on it's own, and I managed to find a set of handles for the dresser and side table for a great price at Canadian Tire (10 silver knobs for $15).  I collected all of these items over the course of a few months prior to starting her room and it was so nice when I finally got the chance to set up everything.

There are definite things to keep in mind when you're redecorating any room:

1-PLAN-decide on a feel or theme.  How would you like the room to look once done? Think of colours, textures, accents etc.  If you're still not sure of the overall feel search the web for samples of your "theme" to help you get a clearer picture.  Give yourself time from when you decide to redo that room to when you actually start.  This time gives you a chance to save so much money by finding things on sale etc.  Take advantage of the time, if you can.

2-THE NOTEBOOK-carry this with you because you just never know what you might find.  Draw a basic floor plan with all dimensions and it doesn't have to be perfect or to scale.  Make a list of what items you need such as furniture pieces, window coverings, frames, and anything else you think you want or need.  Make a list of necessary items such as paint and primer, any painting tools, new switch plates etc.  Make a list of anything you'd love to have in the room-your wishlist.  Having all of this information with you will help you take advantage of any clearance items or sales.  You can find things anywhere, anytime and, with the info in your notebook, you can make quick purchases you would otherwise have to pass on due to indecision.

3-PREPARE-I can't stress this enough.  If you have prepared the walls properly then you will have a much easier time with the painting.  Fill any holes and clean and rinse them well. Use a good primer if needed, use good painting tools and make sure you use good paint!! This is where I don't worry as much about cost. Sure I want to save money but I would rather use quality paint in only one or two coats rather than three or four of the lesser quality.  In the long run you are saving money and one heck of a lot of time. Taping off really helps too especially when you''re looking for clean lines and no major fix ups. And don't forget the drop cloths....believe me they help.  As far as painting furniture goes the prep work can be the most important step. Sand (if necessary) and clean well and be prepared to take your time.

4-IT'S ALL IN THE DETAILS-good details finish a room and you can have a lot of fun with this.  Look for items that work together, that really help solidify your 'feel' whether it's bedding, pillows, frames, or chachkis.  Also look for items that can serve dual purposes such as a bed that provides storage or lovely display boxes that might keep all of your normal dresser items out of sight.  Be creative in your thinking and keep in mind that, unless this is your goal, you don't have to fill an entire table top or wall with items.  Sometimes less is definitely more. which will showcase some of your finds and really make the display stand out more.

5-HAVE FUN-BE CREATIVE-redecorating a room is a lot of work but with every step you will see it transform and you will be able to picture it done and looking marvelous.  You may just want to get it done and over with but try to take the time to enjoy the satisfaction once each step is completed. And once that last touch is done, the pillow plumped, and the last chachki placed just right you can step back and take it all in.  If you're anything like me you will go back to the room constantly just to have a look.  


6-Pat yourself on the back...well done! 

Look for the next post-"Paint-A Primer" (don't be afraid)


Wednesday 27 August 2014

From Garden to a New York State of Mind

My home decor is fairly neutral and there is a flow from room to room.  I am personally not into themes for the general living areas however I love doing theme rooms for kids. Well, it is finally time to redecorate my youngest daughter's room.  As you can see (from the fish-eye view) this room originally had a garden theme.  Yes, I painted grass and a fence and flowers on the walls.  It took quite a while but looked great when done.  My little girl has grown up and wants her room to grow up too.  She loves New York City and the 1930's Waldorf Astoria. (it was so much easier when she wanted to be a princess)  So now I am, finally, starting on this room's transformation. I have been collecting items for some time, including furniture.  Once completed I will share some pictures so you can see what I've done.  I will even do a small break down of ideas and costs.  If all goes according to Hoyle, in a few days, she will be back in her room, and, as long as she doesn't try to order room service, she can stay there contented, at least for a few more years.


Here I Am

So sorry I haven't been on here for so long.  The chaos of life seemed to take precedent these last few months, which left me with no time to really get started on any decorating or to keep up with this blog. During all of the craziness and sadness I never forgot my creative side.  It helped me get through a lot of rough times.  Even though I couldn't physically do any redecorating or redesign I could always plan. My planning book never left me.  I carried it and my smooth pen with me wherever I went.  I know this is the
age of technology but it was so much easier for me to whip out my notebook and jot down some ideas, draw some floor plans,  make lists of what I had and what I needed, and so much more.  Late at night this was my therapy, of sorts.-an escape.Doing this always gave me a little smile and made me remember that, one day, we would have some sort of normal life again.  It made me realize that, no matter what, life would go on.  It may be hit and miss for a while but I will attempt to be more regular with my posts, starting with the redecorating of my youngest daughter's room.  I hope you will take this small journey with me and, maybe, you can get some ideas of your own....

Sunday 19 January 2014

Let Your Ideas Brighten A Room


Love this....now this is thinking outside of the box!!!


Wednesday 15 January 2014

Party Planning Tip#1 (and a great idea for every day)

You're planning an event or working on putting together a new decor plan or even working on your holiday gift list and you forget something.  This can be so frustrating and can even be costly in time and money, because you may purchase the wrong item or have to go back to the store.  It happens to everyone but it doesn't have to.

I am a list person. I log everything when I'm in the midst of planning something. Whether it's a dinner party for 4 or a large gathering I break things down into easily managed sections.  Yes, sometimes I do get carried away with my lists but I definitely don't forget anything and it gives me a great deal of satisfaction when I cross something off.  Okay, I'll admit it, I'm a micro-manager, of myself but I do like it.

Whether you're planning an event or planning your new living room carrying a little notebook around with all the details certainly does help.  For events you can record exactly what you're trying to achieve, be it by colour, theme or design.  You can log your guest list and your menus and any entertainment.  Once you have this basic information you can then jot down exactly what you need to purchase, make or accomplish for each and as you take care of each item you can check it off.  This will save you time and money and will also assist you if someone asks to help. Since you have all the info at your fingertips it's so much easier.

As far as decorating goes, it's always a good idea to have a little notebook with current colour and paint swatches, furniture, window and room measurements,  and any little ideas you may have for changes or "wish list" items.  How many times have you come across something, such as curtains, that you really like and, not only that, they're on clearance but, alas, you're unsure because you don't know it they'll fit or if the colour will work with what you have.  If you have all of your current info in a little notebook you can safely pick up these clearance-priced curtains and feel good about it. And, if you're redecorating, a notebook with wants and wishes and all other pertinent information is so handy to have. It's great to be confident in your design decisions and this notebook information will help you get there.

As far as holiday gifts and supplies go, I am all for a Christmas book. I have used one since 1992 (actually on my 3rd book).  I come across really cool stuff throughout the year that I believe someone specific on my list may like so I will pick it up, log the gift in my book and store the item away in gift bins in my basement.  I also make note of all the supplies I may have purchased in the after-Christmas sales. This is of great use to me because having this updated information ensures that I never double up on gifts or wrap etc.  It also allows me to take advantage of some amazing sales and deals throughout the year, allowing me to buy things that I wouldn't normally be able to afford (I have a large family).  I am usually way ahead of the game by the time December rolls around too, which makes the season a lot less stressful.  Another advantage is the fact that I can look back over the years and see what I've given to everyone.  Once again, avoiding a repeat.  I depend on my Christmas book, so much so that when my old book was falling apart my kids bought me a new one, as part of my Christmas present.

Notebooks and lists may seem like a pain or a lot of work but they're really not and using them can actually save you a lot of time, money and headaches and remember, you can always pick up these notebooks at the dollar store. It's all good!

Tuesday 14 January 2014

The Post-Christmas Decor Blues

So, if you're anything like me, when you decorate for the holidays you move things around, put items in seasonal storage, and even move furniture to other rooms.  Okay, I have a lot of Christmas stuff and the only way I can display it all properly is to change things around.  It looks great but once it's all packed away the rooms look a little dull. After all the sparkle of the season putting your rooms back the way they were can be a little bit of a let down. This is when your creativity should take over.  I'm not talking about completely redecorating, although that's what some people do, but rather reinventing. 

After the boxes have been put away it's a good time to really clean everything.  A fresh, clean start really helps.  Then start looking at what you have in a new light.  Don't automatically place everything back where it was.  If you can, move some furniture around, even if it's only occasional tables.  Change your seating area around.  Make some distinct conversation areas with your furniture.  Grab those really nice throws you have stored in your linen closet and drape them over your chairs or your chesterfield. Think of new groupings for your tables. Sometimes it means exchanging smaller items between rooms.  Regroup your framed, family photos.  Think about how you can use the items you already have in a new way. 

And then (here's where the Dollar store comes in handy) get some new pillow covers for your throw pillows.  Maybe pick up some new, inexpensive frames.  How about some decorative stones in your vases or even coloured rocks to match or compliment your decor.  You may even find some table runners or interesting trays that you can use to break things up.

And don`t forget about your kitchen. Some new plant pots in your window, new dish towels on display, some fresh wooden spoons, or even some chair pads.  You can even buy some interesting glass jars to place on your counter to hold your coffee, tea or sugar.  Minimal expense but they will make things look a lot different.  

Any of these things will make a difference.  I know it helps me to make changes.  It`s a new year so start off with a new outlook, even if it`s only in your living room.


Monday 6 January 2014

Calendar Reminder

Calendars are a great way to make changes in your home and now is the perfect time to buy them.  You can get some really great calendars very inexpensively right now. You could wait until February so the cost will be even less but, remember, if you wait too long your choices will be limited.  It's worth it, even if you aren't going to use the pages right away.  Check out the post "It's A Good Time for Calendars" for some ideas.

Sunday 5 January 2014

An All Purpose Message Board


This year, for my husband's family Christmas gathering, we had to give gifts that were handmade. I wanted to make something unique, decorative and practical for my sister-in-law and came up with this message board.  It is a framed chalkboard/magnet board/corkboard...all in one.

Once I decided what I wanted to do I set out to find my supplies. So, off to a local thrift store I went, searching for a metal tray and a frame to match in size.  I was very lucky to find both. Once home, I trimmed the rim off of the tray.  This is a bit of a slow process because you want to ensure an even cut and for safety reasons, because thin metal edges, and the tools to trim it, can cut easily.  

Once that was done I cleaned and roughed up the metal and then painted it with Chalkboard paint.  There are different paints for this, some brush on (too expensive and time consuming for this project) and a spray on paint, which is what I used.  It must be done in a well ventilated and protected area (you don't want any dust or dirt on your newly painted item and you don't want any paint on anything else) I applied 3 even coats and let each coat dry at least 3 hours. During the drying time I dismantled and painted the frame. 

When all the pieces were dry I glued the metal to a very sturdy piece of cardboard, cut to fit the frame,  with contact cement (be careful with this-cleans up well but very messy while you're working with it).  After that I cut a surround out of a roll of cork I had purchased at an office supply store and glued that onto the cardboard, around the metal piece.  I then cut small shapes out of the cork and mounted them around the join of the cork and metal, cleaning up the area and making the cork thicker for pin use.  Once dried I placed this in the newly painted frame, obviously without the glass, and added some funky magnets and pushpins.  It actually turned out really well and, although a little time consuming, wasn't that difficult.

This project can be done in a variety of ways and sizes and, for smaller projects, most of the supplies can be found at dollar stores and using the cork is a great option if you can't find a piece of metal that fits the frame precisely.  Be creative. Cork Board, Chalk Board or Magnet Board or all three. It's all up to you.

Friday 3 January 2014

Let Your Christmas Cards Live On

So you're starting to clean up after Christmas and you have an assortment of wonderful Christmas cards that have been lovingly sent to you. Seems a shame to just toss them in the recycle bin doesn't it?  Before you make that final move have a look through your stash.  Maybe there is something you could do with some of these cards...reuse before you recycle??

I remember, years ago, my mother would sit down after Christmas and carefully go through all of her cards.  She would then pick out cards that she could cut up , with her pinking sheers, and use as special gift tags for the next year.  I always thought this was a great idea and even did it a few times myself.  You could still do this...make some very personal and, with some crafting, very lavish, one of a kind tags for some special gifts.  

You could also see if any cards work together, either by colour, theme or size and cut the fronts off to be used as part of your decor next year.  These could easily be framed and hung or placed in areas that may need a little Christmas.  Reusable hangers are great for this since they won't mark your walls or cabinets or wherever you choose to hang these special pictures.  You could even change the pictures every year with new cards. Finding matching frames at the dollar store would certainly make your display come together. Collages of these framed cards would really make a statement too, especially if they're placed somewhere you don't normally have pictures or decorations, such as your washroom.   

Instead of framing you could mount the chosen cards on card stock and attach these to wide ribbon (which you should be able to find rather inexpensively after Christmas) and hang these on the front of doors or cupboards. Very visual and festive and because the top of the ribbon is hung on the back of the door or cupboard door there won't be any visible marks.

So, really look at all of these cards before getting rid of them and remember, even if you decide not to remake these wonderful holiday greetings into decorations,  you could always donate them to a school or kids' group for their crafting. It would be nice for these little pieces of art to live on, if only for another season.